Bảo mật SSH với Google Authenticator có thể xem là hình thức bảo mật hàng đầu cho tất cả các dịch vụ liên quan đến an toàn thông tin. Cách gọi thông dụng là bảo mật 2 bước. Hình thức bảo mật này thường thấy khi thực hiện các giao dịch ngân hàng. Sử dụng mật khẩu để sử dụng các dịch vụ và mã code SMS để xác thực khi có giao dịch phát sinh.
Với server Linux thì bảo mật 2 bước cũng được sử dụng xác thực đăng nhập trong nhiều ứng dụng khác nhau. Vì cơ chế này được cung cấp bởi Google nên tính bảo mật rất cao.
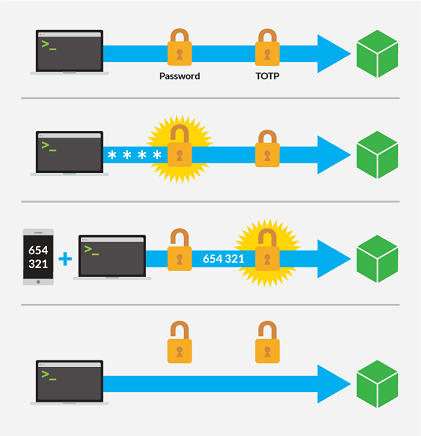
Cơ chế làm việc xác thực 2 bước trong SSH như hình sau:
Bài viết này sẽ hướng dẫn bạn cài đặt 2FA trên server Linux sử dụng Google Authenticator
MỤC LỤC BÀI VIẾT
Hướng dẫn cài đặt:
- Server Debian 10 (hoặc server Debian phiên bản khác đều được)
- User không phải user root có quyền sudo
- Smartphone cài đặt app Google Authenticator
Các bước cài đặt Google Authenticator như sau:
Bước 1: Cài đặt thư viện cho Google Authenticator
1 2 | sudo yum install epel-release sudo yum install google-authenticator |
Bước 2: Cấu hình Google Authenticator cho user
Chạy lệnh sau:
1 | google-authenticator |
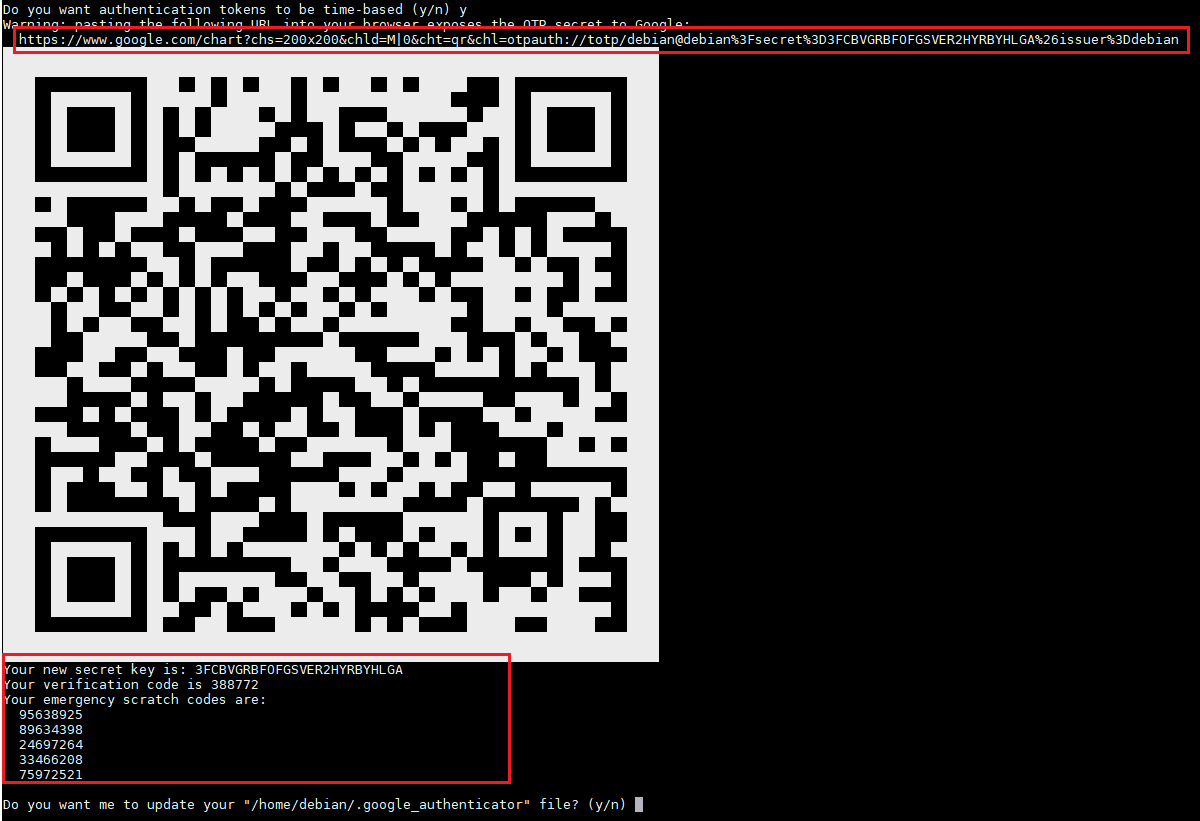
Hiện ra câu hỏi: “Do you want authentication tokens to be time-based (y/n)”
1 | Chọn Y |
Sau đó sẽ hiện ra một mã QR, sử dụng App trên Smartphone thêm user sau đó quét mã code này. Hoặc có thể truy cập đường link chứa mã QR này trên web.

Ngoài ra hãy lưu lại các mã code phía dưới, đó là các mã có thể dùng phòng trường hợp khẩn cấp ví dụ Smartphone bị đánh cắp có thể truy cập vào server để cách ly đảm bảo an toàn cho server.
Do you want me to update your “/home/debian/.google_authenticator” file? (y/n)
1 | Chọn Y |
Do you want to disallow multiple uses of the same authentication token? This restricts you to one login about every 30s, but it increases your chances to notice or even prevent man-in-the-middle attacks (y/n)
1 | Chọn Y |
By default, a new token i
1 | Chọn Y |
s generated every 30 seconds by the mobile app. In order to compensate for possible time-skew between the client and the server, we allow an extra token before and after the current time. This allows for a time skew of up to 30 seconds between authentication server and client. If you experience problems with poor time synchronization, you can increase the window from its default size of 3 permitted codes (one previous code, the current code, the next code) to 17 permitted codes (the 8 previous codes, the current code, and the 8 next codes). This will permit for a time skew of up to 4 minutes between client and server. Do you want to do so? (y/n)
1 | Chọn Y |
Một lỗi thường gặp là thời gian sai lệch giữa server và google dẫn đến mã code không thể đăng nhập được.
If the computer that you are logging into isn’t hardened against brute-force login attempts, you can enable rate-limiting for the authentication module. By default, this limits attackers to no more than 3 login attempts every 30s. Do you want to enable rate-limiting? (y/n)
1 | Chọn Y |
Như vậy đã cấu hình xong Google Authenticator
Bước 3: Cấu hình SSH sử dụng mật khẩu
Mở file config pam
1 | sudo vi /etc/ssh/sshd_config |
Tìm thêm hoăcj sửa
1 2 | ChallengeResponseAuthentication yes UsePAM yes |
Bước 4: Cấu hình SSH sử dụng file key
Nếu sử dụng SSH thông qua file key thì sửa config SSH như sau:
1 | sudo vi /etc/pam.d/sshd |
Thêm dòng sau vào đầu tệp:
1 | auth required pam_google_authenticator.so |
Khởi động lại dịch vụ SSH để apply các cấu hình mới
1 | sudo systemctl restart sshd |
Lưu ý: Để đảm bảo cơ chế hoạt động đúng thì cấu hình thời gian giữa server và smart phone phải đồng bộ thời gian với nhau.
Liên hệ để được hỗ trợ nếu găp lỗi nhé! Zalo/Viber: 0918992587


